Sweet sounds of the VR6
Rev 1Launch
Rev 2
Rev 3
0 to 90.. back to 0
0 to 95 back through the gears
I used my laptop and a good microphone to record the sounds. The first two were recorded from the ground outside the car and subsequent sounds were done with the laptop buckled into the back seat and the microphone stuffed into a stocking cap (to cut wind noise) hanging out from under the rear hatch above the bumper near the exhaust. You shoulda seen the laptop sliding around the back seat before I thought to buckle it in with the center seatbelt.
The "whooshing" sound is not the wind. It is actually the sound of the air coming out the exhaust from a foot above. Note that the sound goes away whenever I'm off the throttle, and the car is almost totally quiet at 90mph in 5th gear at neutral throttle. I'm pretty sure that the tires make up most of the rest of the background sound. If I could isolate only the growl of the engine, I would.
For comments or pointers to a good app that does FFT filtering, mail to frechett@houseofthud.com
All sounds freely available for non-commercial use. Ask otherwise.
FFT plots for performance measurement
Well, I found the FFT filter. CoolEdit 96. I downsampled bgbst-11.wav (0-95...etc) to only 1000 samples per second which limits it to frequencies between 0 and 500Hz. The spectrum analyzer then gives the following image.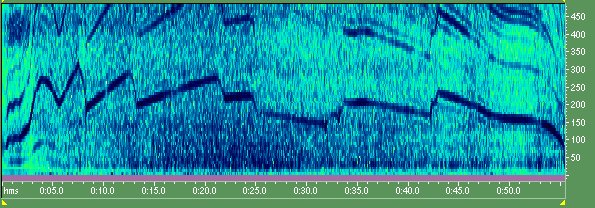
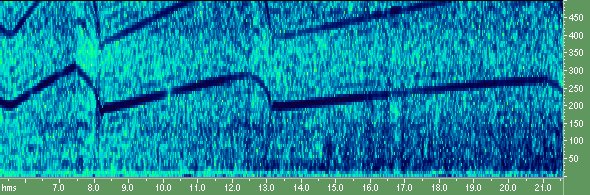
and by zooming in, here's an image of the run through only 1st, 2nd and 3rd.
So what's the point?
Well, look at the information contained here. What you're seeing is the frequency of the sound made by the firing of the engine. This is a 6 cylinder engine so that means there are 3 bangs per revolution.
So to take a couple examples:
5000 rpms = 83.3 revs per sec multiplied by 3 = 250 Hz.
2000 rpms = 33.3 revs per sec multiplied by 3 = 100 Hz.
The frequency scale is on the right, and time on the bottom so you're effectively plotting rpms on a time scale. This is useful info if you want to know how fast your car is accelerating. There's obviously a little fudge factor here because of the thickness of the frequency plot but consider how useful this could be for doing comparison plots. Even if you can't get a totally exact rpm versus time, you can see quite easily when one plot is shorter or longer than another, even with the slight fudging. A shorter steeper line on the same time scale indicates faster acceleration.
You can even calculate a 0 to 60 (or whatever to whatever) time by first going back into your car and recording 2 or 3 datapoints with rpms versus mph for a couple different fixed speeds. With a straight line showing mph/rpm for all 5 gears, you can then go back to the plot above and find your speed for any point on the graph. And given the nature of digital recording, you have a built in, highly accurate time scale.
Neat thing about this method is that if you have a computer with a sound card, it'll cost you only the price of a tape recorder and microphone. If you have a laptop, it'll only cost you the price of a microphone. It's also nice because you can take recordings with voice annotations and simply go back and analyze them later at your leisure.
Another example:
Knowing that 60mph comes at the top of 2nd gear you can go back to the image above and look at the 0 to 60 section.
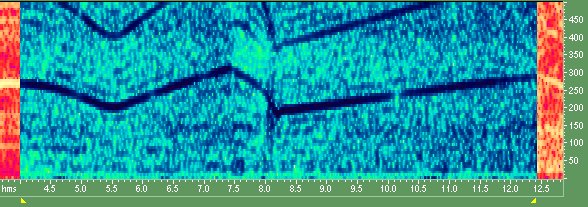
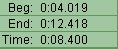
Basically, the car starts to move when the clutch is engaged and the rpms start to fall. I don't have an exact rpm for 60mph yet, but let's assume for the sake of argument it occurred at the moment I shifted out of second. I've highlighted these points. So from reading the time scale you see 4.0 to 12.4 seconds is a pitiful 8.4 second 0-60 time. In my defense, it's a brand new car so I wasn't thrashing the engine at all. This was first part of a nice comfortable run up to 90mph to exercise all the gears. I'll have to do this again when the car is broken in.
Tools
This is how I did all this. I recorded the sound of the car using my laptop and a decent quality microphone. The mic was hanging out the hatch, but for these low frequency sounds you should be able to record from inside the cabin. Putting the mic on the floor or under the dash near the firewall will probably get you the best sound. Without a laptop, just record to a tape deck, then plug it into the mic or line in on your soundcard and sample that. That has the advantage of letting you control the record level when it goes into the computer.
Each sample was recorded at 22Khz sampling frequency but there's no need for that. Sample at the lowest sampling rate you've got, as all the frequencies you want are below 500 Hz (which would be 10000 rpms). I then used Cool Edit 96 (32 bit version) to downsample the file to only a 1000 sample per second rate, (0-500Hz).
Note:While CoolEdit doesn't display a 1000Hz sampling rate option, you can type it in yourself when you go to the "Edit - Convert Sample Type" option. Then I switched CoolEdit to the "Spectral View" and that's it. The rest is just zooming in here and there, and sometimes sliding the vertical scale up and down to use the top of the display window to line up points on the plot with the frequencies on the vertical scale. Ranges can be selected with the mouse or arrow keys (plus shift key). Highlighting also makes the frequency plot stand out nicely. The exact start and end time values for a highlighted region are displayed in millisecond resolution on the right.
It's very simple to do, and the plots are much clearer than I could have ever hoped. When I first displayed the spectrum from the original 22Khz sample, I didn't think I'd find anything useful at the bottom, but I was pleasantly surprised.
Switches
Well, here's the problem. I've been thinking about the 0-60 plot, and something was troubling me. Others have pointed it out as well. With a little calibration, determining what rpm exactly matches 60mph is not a problem. The problem is figuring out where 0 is in 0-60. I made a bit of a guess above, because I know how I drive, and that the car doesn't really move until the revs start to fall. If I were harder on the clutch that might not be true and it would be very hard to figure out where the car starts moving based only on the frequency plot.Well, here's what I came up with. A motion switch. Using either a mercury switch, (which are very hard to buy these days), or a "ball switch" (a ball bearing in a metal cage) or what I call a "fall switch" which is something that is basically balanced and falls over to close the circuit, I can determine exactly when the car starts to move. So where do you put the switch? Inline in the microphone cord. This way you can start the recording device, reset the switch (open), and then make your run. The instant the car moves, it closes the switch and the recorder actually starts hearing something. (recording silence prior to that point)
With a stereo microphone you can even do one better. Only put the switch on one channel. That way you get one plot that shows engine rpms prior to, and including the launch and the other which starts at the moment of launch and can simply be used as a timing reference.
My vision is simply to use a small project box from rad shack. Inside will be:
First tie the core (+) wire from the male phono plug and the wire from the female plug to the "open" circuit on the relay. When the relay is off (no power) the microphone circuit will be active.
Then make a circuit that goes from one lead of the battery, through the motion switch, then through the separate closed circuit on the relay then to one lead of the relay's magnetic coil. The other coil lead goes back to the battery. What have we accomplished with this? Assuming the motion switch can rest in the closed state (on), then once the relay is turned on, it will create a circuit that will hold it on until the motion switch trips and kills power to the magnet. When the relay opens, it switches on the microphone, but also kills power to the above power circuit for good. No matter what the motion switch does now, it can't power the relay and disconnect the microphone circuit.
All that's left now is the pushbutton and light. Simply wire it in parallel to the coil. Battery (+) to switch, switch to coil (+), coil (-) to battery (-). For frills go back to the more complicated circuit above and throw the LED in series there. As long as the battery can run the relay coil magnet and the LED at the same time you're ok.
So when you push the button, it turns on the relay, and the light. If the light goes out when you release the button then adjust your motion switch so that it is resting in the closed state. The light should stay on after you release the button. This indicates that the microphone circuit is disconnected. As soon as you move the device, the light should go out and the microphone circuit should go on. Plug the male plug into your recording device. Plug the microphone into the female plug on the box, and go to it.
Note: If you can't find a motion switch that rests in the closed state then wire everything up so the microphone is on the relay's closed circuit. Wire the power circuit without the motion switch but with a toggle switch that rests in the closed state in series. Then hook the motion switch up directly to the coil and battery. When the motion switch goes on, it switches the relay on, and then one of the relay's closed circuits keeps power flowing to it's own coil, holding itself on until you hit the toggle switch to turn it off. The other closed circuit keeps the microphone on. Unfortunately this setup uses power the whole time you're recording but it's not that bad. I'd used a toggle switch here because otherwise you'd be constantly turning this thing on accidentally.
PC Tools
Believe it or not, that's all I used. For the frequency plots, I didn't even do any noise filtering. Just downsampled one of the sounds you hear at the top of the page from 22Khz to 1000Hz and you've seen the rest. I do intend to see if the frequency lines get any thinner if I sample at a higher sampling rate, but I don't think they will. (All the frequencies we're interested in are very low) The best way to get thinner lines will be to find a better placement for the microphone. Probably closer to the engine, or even under the hood.
Anyway, have fun. Mail comments to frechett@houseofthud.com
Back to the top of this page
My home page as of yet, unrelated to my car.
GTI VR6.NET with incredibly useful information about the GTI VR6
VWNetz has lots of good VW pictures.