This mod will allow you to turn on the fogs when the stock switch is in the OFF position. If you still have the DRL relay, then it means fogs plus DRLs. If you pull the DRL relay, then this mod will let you run fogs alone, with all other lights dark. (No DRLs, no running lights.)
Tools you'll need:
- At least two small flat blade screw drivers. (smaller the better)
- Your drivers license. (Really.. you'll see. Any flat plastic card without raised lettering wil do.)
- A Dremel tool, with small routing bit. (Every dremel tool comes with at least one of these bits). Lacking a Dremel tool, you might be able to do this with very sharp knife if you have a bench vice to hold the plastic pieces (see below). The plastic is pretty tough stuff.
Start by getting the stock switch out. Pop the cover out to the left of the switch. Then look at the very last picture on the Euroswitch photo page in the library. From the hole you've just opened up you should be able to see the triangular catch from the picture. Push it in, while simultaneously pulling on the switch. It should slide out far enough to get the wiring harness off the back. Don't let the connector slide too far back into the hole, or you'll have to fish it out.
 Now the fun begins.
On the top and bottom of the switch right along the back
edge are 6 tabs that hold it together. 3 on top, 3 on the
bottom. This is what you do. Slide one of the
screwdrivers in right next to the center tab. Then take
your drivers license (or other smooth
credit card sized piece of plastic) into the gap next to
the screwdriver and slide it in as far as it'll go. Pull
the screwdriver out and stick it in near each of the tabs
on either side and jam the card in over both remaining
tabs. You can cover them both, if you angle the card a
little, but the straighter it goes in the easier it'll
be.
Now the fun begins.
On the top and bottom of the switch right along the back
edge are 6 tabs that hold it together. 3 on top, 3 on the
bottom. This is what you do. Slide one of the
screwdrivers in right next to the center tab. Then take
your drivers license (or other smooth
credit card sized piece of plastic) into the gap next to
the screwdriver and slide it in as far as it'll go. Pull
the screwdriver out and stick it in near each of the tabs
on either side and jam the card in over both remaining
tabs. You can cover them both, if you angle the card a
little, but the straighter it goes in the easier it'll
be. Now either find another card and repeat on the other side, or do what I did. Just slide the two screwdrivers in next to the outer tabs on the back side, and then tug on the rear connector (Do not push on the knob on the front.. It doesn't push though.) until it moves enough so that the tabs can't catch in the holes any more.
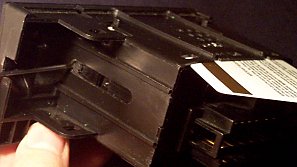
Now pull one of the screw drivers out and bring it around to the side. (See the picture above). There's a little shaft in a slot with a narrowed end with a catch. Stick the blade of the screwdriver behind the shaft (as shown on the left) and pry the shaft forward in the slot. This is what's actually holding it all together now that the tabs are freed up. Once it moves a quarter inch, it'll free up, and slide another half inch or so and then catch again. Just pull hard and it'll pop open.
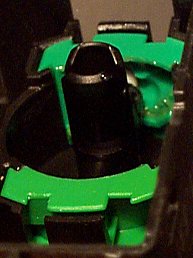
 This is
what you'll be looking at now. The two green pieces
contain the "ramp". In the pictures you can see
a little white tip. It's spring loaded and it moves in
the grooves to provide all the stops you feel when you
turn and pull the switch knob, as well as holding the
mechanism together. What you need to do is get those
green pieces out. It's simpler than it looks.
This is
what you'll be looking at now. The two green pieces
contain the "ramp". In the pictures you can see
a little white tip. It's spring loaded and it moves in
the grooves to provide all the stops you feel when you
turn and pull the switch knob, as well as holding the
mechanism together. What you need to do is get those
green pieces out. It's simpler than it looks. Stick one of those really small screw drivers in there and pry the spring loaded tip back into the shaft in which it lives. When you get it back as far as you can, try turning the knob on the switch a little so that the white tip jams against the black frame. If it won't move on the side you started with, try it on the other side. Once you get the tip to stick, hold onto the knob, pull the screwdriver out and push the tip back on the other side. As soon as it retracts, the switch will turn, moving the arm and tips out of the way of the green pieces.
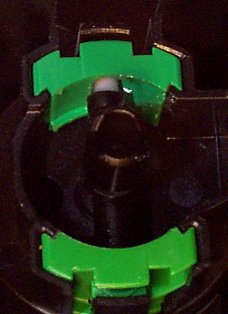
 Now you can pull the green parts out. See in
the picture how the arms are turned just barely out of
the way. That prevents the spring loaded white tips from
popping out. If you do turn it too far and it pops out
the hole in the top of the switch housing, just shove it
back in with your finger hard, and turn
the knob counter clockwise and it'll retract and end up
resting where I have it shown.
Now you can pull the green parts out. See in
the picture how the arms are turned just barely out of
the way. That prevents the spring loaded white tips from
popping out. If you do turn it too far and it pops out
the hole in the top of the switch housing, just shove it
back in with your finger hard, and turn
the knob counter clockwise and it'll retract and end up
resting where I have it shown. Anyway, you can see the ramps. They prevent you from pulling the switch straight out when the knob is in the off position.
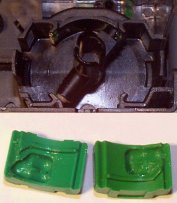
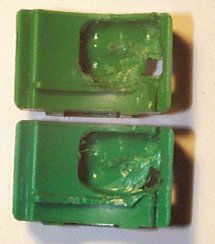 Now the trick is to
shave away the ramp. You want the depression to look like
a big rectangle instead of a trapezoid. If you turn the
part over you'll notice that the plastic is thinner on
the back out where the ramp is. That means that if you
trim it all out to the same depth it'll actually chew a
hole all the way through the plastic. As you can see from
the pictures on the right, that is exactly what happened
to me. It looks like a big hole in the picture but it's
not. It's still smaller than the end of the white spring
loaded tip, so the hole basically serves as a slight
depression and makes a nice stop for the new switch
position you're creating.This position is the fogs on,
lights off position. Don't let the hole grow any bigger
than what I've shown though. Just be sure to trim away
the plastic along the right edge evenly.
Now the trick is to
shave away the ramp. You want the depression to look like
a big rectangle instead of a trapezoid. If you turn the
part over you'll notice that the plastic is thinner on
the back out where the ramp is. That means that if you
trim it all out to the same depth it'll actually chew a
hole all the way through the plastic. As you can see from
the pictures on the right, that is exactly what happened
to me. It looks like a big hole in the picture but it's
not. It's still smaller than the end of the white spring
loaded tip, so the hole basically serves as a slight
depression and makes a nice stop for the new switch
position you're creating.This position is the fogs on,
lights off position. Don't let the hole grow any bigger
than what I've shown though. Just be sure to trim away
the plastic along the right edge evenly. Once you've trimmed it out, put the green pieces back in and test the feel of the switch. On mine, I can now pull it straight out, and it's as far out when the knob is in the OFF (left) position as it is in the ON (right) position.
Once you're happy, simply slide everything back together until it clips. Hook the harness back up, and test it with the car running before you stick it back in the dash.
Note: I don't really recomend this new lighting option for actually driving in the fog, because the rear running lights are dark, which means noone else can see you. However, for those that have pulled their DRL relay, this could be used in case you feel you want to use the fogs as DRLs occasionally. Sometimes it is good to be seen.
With this zero cost mod, plus the jumper and bridge mod, (See the Euroswitch pictures page again), and with the DRL relay removed you'll have the following options.
- Dark - no lights
- fogs only, no running lights
- running lights, low beams
- running lights, low beams, fogs
- running lights low beams, high beams
- running lights low beams, high beams fogs
If you choose to leave the the DRL relay in, add "DRL" to the first two options.
Return to my home page.