MKIII VR6: ABS
Pump and Module Removal and Replacement
Preface:
My ABS light was on and stayed on while driving.
I located a used hydraulic pump and module unit (you can separate them, I
think) and replaced the whole unit. My
car is a 1998 GTI VR6 with 111,000 miles equipped with the TEVES 20 GI ABS
system. This system controls
the ABS/EDL (Anti-lock brakes and Electronic Differential Lock).
On cars ‘96+ (without a brake proportioning valve), the module also
controls front/rear brake bias. Apparently,
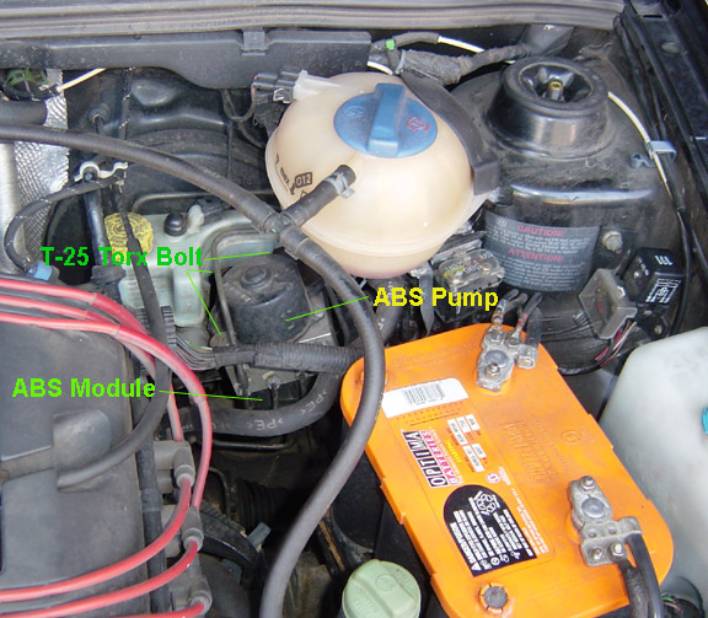
the module is known to fail on many other European cars including Volvo and
Seat. A picture of the engine bay
is below.
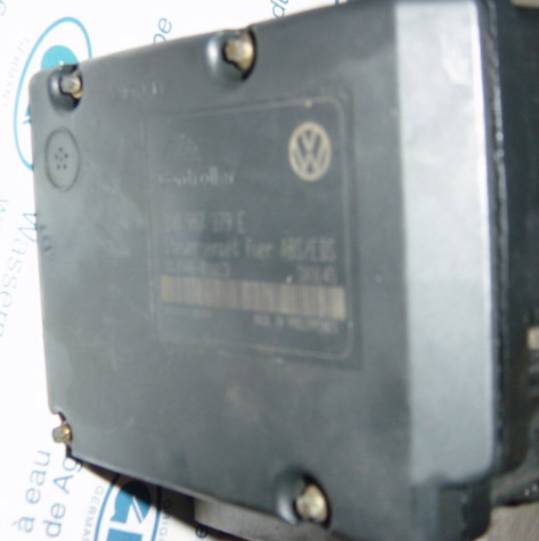
The numbers and codes from my ABS module
are:
Component:
ABS/EDL ITTAE20 GI V00
Module:
3A0 907 379 E
Code:
03704
Tools required:
- VAG-COM
Diagnostic tool or Ross-Tech
- T-25
Torx driver
- 11mm
line wrench (or flare nut)
- 13mm
line wrench (or flare nut)
- 10mm
box wrench
- New
hydraulic pump and module
- Brake
parts cleaner
- 2-3
liters of brake fluid
- Brake
bleeder or a clean glass jar and some clear tubing for 2 man bleeding
The Symptoms:
ABS light on and stays on while driving.
I used the VAG-COM to read the fault codes (DTC) and got this Code:
“Fault
code 01276: Hydraulic Pump - V64 Signal outside specifications”
Things
to check first:
There are 2, 15-amp, fuses at the top of the fuse/relay
board. Make sure that they are not
blown. Also there is another fuse
in the main row of fuses that is related to ABS – check that one, too.
The procedure: (removal)
- First,
use the VAG-COM tool and write down the numbers and codes for your control
module. You will need this
later!
- I
suggest you do this on a cool engine, or you will likely burn your forearms.
I would also recommend jacking the car up and placing it on jack
stands at all four corners, since it makes it a lot easier to bleed later
with all four wheels removed.
- Disconnect
the battery (both terminals, negative first) then remove it, as you will
need the room.
- Drain
the brake reservoir using a turkey baster, or open a bleeder screw and allow
the fluid to run until the reservoir is empty. Discard the old fluid; you
should use fresh fluid to refill the system.
- Place
a rag or towel under the brake master cylinder as you will lose some fluid
and you won’t want it to sit on the CV boot.
- Loosen
all 6 lines running into the ABS. The
two top lines are 13mm and the 4 bottom lines are 11mm.
Unscrew all of the lines and move them out of your way (they won’t
move far because they are not flexible).
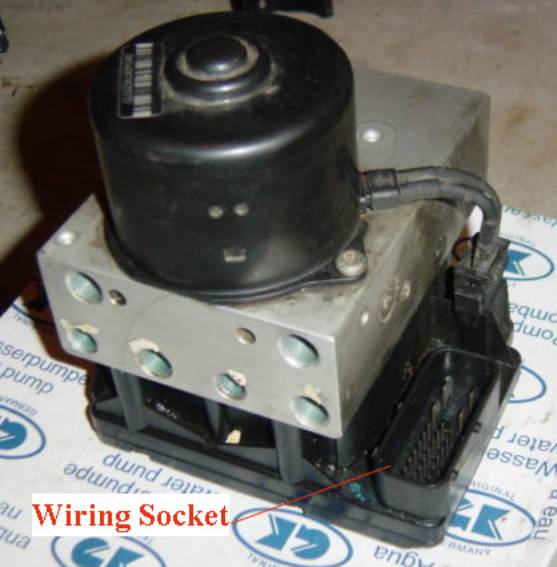
- Disconnect
the wiring harness from the module. It
is located on the outside of the module.
To disconnect it, you must pull the small “T” shaped handle
toward the front of the car. It
will move about 1 inch then you can move the plug out of your way.
- Use
the T-25 Torx to loosen the 3 brass colored bolts on the upper surface of
the ABS unit. The front one is
easy to see. It is the size of
a nickel and brass with a rubber bushing under it. The other 2 are in the back corners but you can get to
them fairly easily. You don’t
need to remove the screws from the mounting bracket. It is easier to access
the rear bolts if you disconnect the brake fluid level sensor on the
reservoir above the ABS unit.
- Once
the screws are unbolted GENTLY wiggle the unit forward.
Be careful not to kink or bend the brake lines while removing it.
There are a wiring harness and a coolant hose that pass in front of
the ABS unit. If you have a helper, have him hold the harness and hose out
of the way.
- At
this point you can separate the module from the hydraulic pump assembly and
swap with the new part. I
replaced both parts (pump and module)
- To
install a new unit, simply reverse the removal process.
- After
installing the unit and attaching all the lines (don’t over-tighten) and
plugging in the wiring harness you will need to refill the brake fluid
reservoir and bleed the brakes. Start
with the rear passenger caliper; then do the rear driver, front passenger,
and then front driver. After
you bleed the brakes, you will notice that you won’t have a very good
pedal feel (i.e., it will go to the floor). That’s OK; you’ll correct
this later. Be sure to keep the
reservoir topped up during the bleeding process to keep air out of the
lines.
- Re-install
the battery.
- Use
the VAG-COM to check the coding of your new ABS module. The data should
match the data you copied down in step 1. If not, re-code the module as
necessary.
- Then
cycle the pump using the VAG-COM software. To do this, choose “ABS Brakes” from the main menu.
Then select “Test Output” and follow the on-screen instructions.
The computer will cycle the pump, and then test each of the valve
positions, one corner at a time. After
this is done, you should have good brake feel again. I’ve heard that
running the pump for more than 30 seconds or so could lead to the pump
overheating and susbsequent damage, so accomplish this procedure reasonably
quickly.

- I
re-bled my brakes to get any air released by the pump, cleaned the calipers
with brake parts cleaner, and Voilà! Your ABS light should be out and your
ABS will work again. During the first road test, I noticed that the pedal
was slightly mushy and had slightly greater travel. This went away after
driving the car for a day or so and became very firm and confident feeling.
YMMV.